Monday, 6 December 2010

Oh Poop!

Woke up this morning to almost blizzard conditions and another 6- 8 inches of snow.  I made the decision not to send my daughter out even though the school had officially reopened, according to the Fife Council website.  Within half an hour the list of schools closed in Fife rose from 12 to 95 before the site finally crashed.  Feel especially sorry for all the kids who have their prelims in January, as there will be a mountain of schoolwork to catch up when they do eventually return to the classroom ... whenever that may be.

Spent part of the weekend, when I wasn't clearing snow,  making some fun stuff for Naomi's pals, as an alternative to Christmas cards ... hence the title!
I know there are some people who frown on this idea, considering it 'toilet humour' and they're perfectly entitled to their opinion, but personally, I think it's just a bit of fun and am sure the kids would much prefer some sweet goodies to a Christmas card anyway!
So we have bags of 
Penguin Poop ... filled with chocolate raisins
Reindeer Poop ... filled with Maltesers
And for those of a more delicate nature ...
Snowman Kisses ... filled with mini marshmallows.
The snow seems to have stopped for the moment so it's on with the wellies and out with the shovel to get clearing.  
Stay safe wherever you are and just a reminder to keep one eye on any elderly or infirm neighbours you might have as they may not be receiving their usual level of care during this severe weather.
Monday, 29 November 2010

School's Out - It's Snowing!

This is the view from our front door this morning.  
Fresh virgin snow always looks so pretty.  I especially love how everything looks so clean and everyday sounds seem slightly muffled ... like everywhere's wrapped in cotton wool.   But there's no denying that the arrival of snow brings havoc and disruption, as has been reported on all the news channels this weekend.  Here in Fife, every school and nursery is closed today and there's more snow forecast for later so the kids are happy ... if the squeals of delight from outside are anything to go by!  Snowmen and igloos will be the order of the day I think.
We have plenty of soup in the cupboard though ... so reckon we'll just snuggle down in front of the fire with a mug of hot chocolate and a packet (or 2) of choccy biccies to wait for the thaw. 
For those unfortunate people who have no choice but to venture out in it ... take care and stay safe xxx

Friday, 26 November 2010

Bah Humbug Blues

Over at Bah! Humbug Challenges, the DT have set the final challenge for this year and are preparing to wind down for Christmas ... unlike everywhere else in blogland where they are winding things up as the magic month approaches.
We will really miss our Friday get-togethers with the loyal friends who have supported us throughout our debut year and "Humbugger Hall" will seem very cold and lonely without them. So it is fitting that this week our challenge theme is "Feeling The Blues" 
Icy blue card and pretty snowflake paper, combined with silver mirri card provide a perfect base for this beautiful large white snowflake, which is from a set of tree decorations I spied in Asda.  I just lurrrrve the texture and hint of sparkle but if you are tempted to get some yourself, then take the precaution of opening the packet in a shoebox or something similar and spray both sides with cheap hairspray before use to help reduce the 'shedding' of bits.
Silver snowflakes and some ice blue glitter ribbon were added to embellish the greeting which was stamped with a Pearlescent Blue Dew Drop ink pad and cut with a scalloped punch, before being popped on with silicon glue.
Inside was decorated with a leftover strip of mirri card which had been diecut with Marianne Snowflake for another project and was conveniently lying on the desk, along with a sparkly peel off greeting matted onto mirri card.
A couple of blue star gems are the final finishing touch to the snowflakes.
I will be entering my card into Simon Says Stamp Challenge -Let It Snow which qualifies me for entry to Lorraine's sponsored Blog Candy for the chance to win an adorable House Mouse stamp.  Am also joining in with Wild Rose Studio's Blog Hop as the layout follows Dawny P's sketch ... if you turn it 90 degrees. There's a fantastic prize on offer and all the DT members have a stamp to give away, so plenty of chances to win.

There's lots still to do at Humbugger Hall before we close and padlock the huge iron gates for the last time and settle down to hibernate with the dust and cobwebs. Including the announcement of our Special Prize Draw winners next week, which will be very exciting, so don't miss it.
Meanwhile there's a challenge for you to be getting on with ... so GET ON WITH IT!   Remember to leave us a link or we may be forced to let the Humbug Hounds out ... and you wouldn't want us to do that as they haven't been fed since .... ermmmm ... January!

Saturday, 20 November 2010

Bah! Humbug! 45

Our Bah! Humbug! Challenge this week is a colour theme and we want you to pick through your 'purples' and show us some Lilac.
I have been itching to ink up the new November release Waltzing Mouse Stamps that arrived earlier this week and, (as time has once again been my enemy), I opted to keep things as simple as possible. 
I chose to stamp this holly, from 'Around Christmastime' set, onto some lavender card and then heat embossed with silver powder, before cutting out with a scalloped circle punch and adding some purple adhesive pearls. 
Then I found some lilac card and dragged out the Cuttlebug and a couple of Christmassy embossing folders for the next stage.  
First I used the 'Mistletoe' folder on a square of lilac card, and matted it to silver mirri with double-sided tape, before adding a few random pearls.  Then, on an identical square, I decided to use only part of the 'Snowflake Frame' folder on opposite edges.  
To do this, you place the card into the folder as normal, place your 2nd 'B' plate over the portion you want embossed and then roll the sandwich through the cuttlebug, making sure you hit reverse when you reach the edge of that 2nd 'B' plate.  Do this on both edges and remember  YOU MUSTN'T GO ALL THE WAY!  
(Hmmm ... that phrase sounds very familiar but can't recall for the life of me where I've heard it before ... )  Ahem .... *snigger*
Now there's every chance that my rather inadequate instructions have totally confused you ... actually I think I've confused myself and I know that I know what I mean!  However, I'm sure you will understand once you try it for yourself and if not then I'll find a link to a tutorial for you.
OK ... back to the card ... 
Pearlescent lavender ink was roughly rubbed over the embossed snowflakes and this square was cut diagonally.  The triangle edges were then heat embossed with silver and matted onto a slightly larger triangle of lavender card before attaching on top of the embossed square.   
All that remained to do now was add the punched holly circle, stamp and emboss the fabby sentiment, which is from the WMS 'Festive Foliage' set, and add a lilac bow.
At first I thought the 'mistletoe' embossing looked a bit boring and I was tempted to add some sparkle.  However, I've decided I quite like the contrast between the matt look and the pearlescent sheen of both panels so am going to leave it be for now.
Incidently, I used the remaining triangular section to decorate inside but forgot to take a photo.

Friday, 12 November 2010

Bah! Humbug! 44

Apologies for being so late this week - this post was scheduled for this morning but ended up in 'draft somehow.  Anyway ... am here now.
This week's card features one of the most universally instantly recognisable Christmas characters of all time!  Little Rudi ... and his secret twin brother ... have been playing around with the tree lights and got themselves in a little bit of a guddle.  Tut tut ... but their really cute expressions melt the heart so it's difficult to be cross with them for too long.   
Let me tell you, they weren't the only one's to 'get in a guddle' this week either!  Everything was layered up and looking fine until the very last moment when disaster struck!  The red stickles bottle split open, just as I was adding the last wee bit of sparkle to the letters and spewed red, sticky, sparkly, gloopy mess, all over the almost completed card!  Don't you just hate it when that happens? GRRRRRRRRRrrrrrrrrr ... the air was a glorious shade of blue as I desperately tried to save something ... ANYTHING!  But alas t'was to no avail.  The card was a definite 'bin job' and I had to start all over again.   

Apologies that the letters look a little curled up,  but the glitter and the snow weren't quite dry when I took the photos.  They look fine now and if I get a chance I will re-take photos.
Fortunately I had a spare set of images and letters printed off and knew exactly what I wanted to do, having already done it once,  so it didn't take long to cut them out and put it all together. AGAIN.  The only thing missing on this version are the red berries on the tree, but that will be rectified when my new bottle of red stickles arrives LOL!  Well ... you've gotta' larf!
Hopefully my fellow Bah Humbuggers and our Guest Designer Pat had a less stressful time with their projects.   We have also announced a winner for our Embossing Folder Prize so check out Bah! Humbug! right now to see if it's you.

Tuesday, 9 November 2010

Birthday Princess

At the Sugar Bowl this week, there is a sketch to follow and, as always, a fabulous prize is up for grabs for one lucky winner.
My entry uses the Sugar Nellie Manga Princess image, stamped in black onto white card and her hair and skin were coloured with Promarkers.   Her dress and tiara were paper-pieced using pretty My Mind's Eye paper with a subtle floral pattern.  
The petticoat was also paper-pieced but with white card which was sparkled up using Cotton Candy Stickles and the image was then mounted onto blue paper with foam pads for dimension before being cut around with decorative scissors.
The floral backing paper is a 6" x 6" sheet from the same MME pad, adhered to a cream tent fold card blank.   Aqua Stickles were rubbed over the embossed circle which had been cut with wavy-edged scissors to match the lower panel, before I added a rub-on greeting and placed a holographic 3D butterfly to hover daintily over the edge of the image. 
The inside was simply decorated with the leftover strips matted onto card leaving a narrow border. 
Hopefully the Birthday Princess for whom this card is intended will forgive me for neglecting to add any ribbons or bows, which was the Sugar Bowl optional theme, but I kind've ran out of room.

Saturday, 6 November 2010

WMS - Tag Challenge

I have been trying all day to upload this tag as my entry for Waltzing Mouse Stamps 'Tag You're It' Challenge with the opportunity of potentially winning up to £125 worth of goodies.  YES I KNOW!   
IT'S AN AWESOME PRIZE
Elf Shoe Silhouette Tag
Inside View
Holograhic Embossing Powder
Anyhow ... I've been struggling all day and this will probably going to be my last chance as the deadline closes in about an hour, so please forgive me for not supplying all the 'deets' - will be back later!

Friday, 5 November 2010

Bah! Humbug! Challenge 43

It's the final month of challenges for 2010 over at Bah! Humbug! and we have a brand new Guest Designer Pat of Pip's Pastimes joining us.  So if you haven't already made a start on your Christmas cards this year ... and if not then WHY not? ... then you might benefit from checking out our projects this week to get you in the mood.
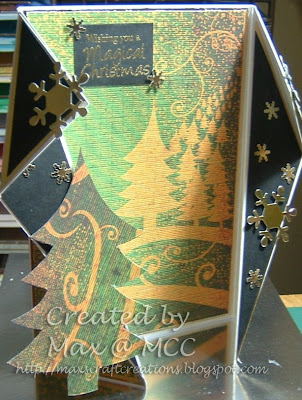
My Fancy Fold offering is quite simply an ordinary gatefold card with a couple of extra folds thrown in on the front panels for added interest.    
The fabulous green and gold Christmas tree paper is from Dovecraft Vintage Christmas Collection and is matted onto gold mirri card to really bring out the warm tones.   
After cutting the main piece for the back panel, I cut one of the trees from the remains to pop onto the front for some added dimension.  I can't decide whether to add some adhesive gems or not - what do you think?
The large snowflakes are a Marianne die cut from gold mirri card and the tiny ones are made with a small snowflake punch.   The stamped greeting has been heat embossed with gold on black card and is one of the messages from a Buzzcraft Christmas set - a recent sale bargain.
My fellow Bah! Humbuggers are waiting to show you their projects too and if you need any further persuasion to get out your Christmas stash and join in then we have a wee prize up for grabs this week for one lucky random entry.

Wednesday, 3 November 2010

Sugar Nellie Sneaky Peek

Oh My Giddy Aunt!  
Just check out these adorable new soon-to-be-released beauties I've spotted over at Sugar Nellie Stamps

Friday, 29 October 2010

Bah! Humbug! 42

Okay - Hands Up - Who stole the week?  
Sheeesh ... Fridays seem to come around so quickly these days.   But the good thing is that  
Friday = Bah! Humbug! Challenge Day - YAHAY!
This week the team are looking for Presents.   
Now when I say that I don't mean literally ... we don't want you to send us presents ... EEEK! ... How outrageous would that be?   Such bad manners!  Shameless!  Unthinkable!    No, no, NO!   
What I ACTUALLY mean is that we'd like you to follow our theme of Presents on your projects.  YES!  That's what I mean ... well ... I think it is  LOL!
Easel cards have exploded into the crafty community and are now a firm favourite with crafters worldwide because they are so easy to make.  
The cute teddy is a from a Kanban stamp set which I bought at Kitty Krafts when I visited and this is it's first outing.  Isn't he adorable?
He was coloured with Promarkers and then cut out before adding Star Dust Stickles to the furry trim and Black Stickles to his nose.  Click the Pic for a close up.
I'd originally planned to create my trio of gifts from patterned papers but I discovered a stash of square fabric samples which were much more 'touchy-feely' and made a really good alternative.  I added ribbons, bows and a pretty star embellishment before arranging them on some gold mirri card and sitting ted on top.  I then cut around the outline, leaving a narrow border and used foam pads to adhere it to the base card, which had already been decorated with snowflake paper matted onto blue textured card. 
The greeting is another Kanban stamp, which was cut around and mounted onto layers of red mirri card cut with Nestabilities, pink glitter card and blue card cut with deckle edged scissors, all raised up with silicon glue to create the stop strip.
My fellow Humbuggers and Guest Designer Jenny also have some fabulous present projects to show you so pop over and take a peek, before hurrying off to make your own.  Don't forget to come back though and leave us a link so we can come and admire your gift ideas.  
OH and if anyone is feeling particularly generous and should want my address then ..... tee hee hee xxx ... just kidding!

Friday, 22 October 2010

Bah! Humbug! 41

Sorry I'm a bit late this week but things have been rather hectic with a horse emergency over the last couple of days.  However ... things have quietened down now, the panic is over and tears have been kissed away,  so on with the show.
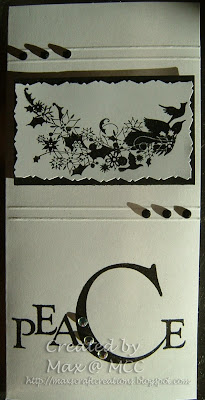
For this week's Elegance Challenge at Bah! Humbug! I decided to keep it simple with a black and white colour combination and some embossed stamping.   
The gorgeous silhouette birds are Inkadinkadoo stamps, which I think are beautifully elegant and they work wonderfully when teamed with the fabulous Peace stamp from Clarity Stamps.     
Everything was stamped with black ink and then embossed with holographic powder for a lovely touch of shine.   
A little bit of black card for matting and trios of adhesive gems are all the extra touches that are needed.
 
Further examples of elegance can be found by my teamies and our Guest Designer Jenny at Bah! Humbug! so pop over there and take a looksee.
I am heading off to Dundee now with Naomi for some bowling coaching, so catch you all later.  It's all go y'know!

Friday, 15 October 2010

Bah! Humbug! 40

Hmmmm ... not sure whether it was my fault or Mr. Blogger but my 'scheduled' post was in 'draft' hence it is so late ... apologies for that.  But not to worry - am here now.
The theme at Bah! Humbug! this week had me in a bit of a 'dither' as I very rarely use vellum in my cardmaking.  Not because I don't like it ... and not because I don't have any.  Just because I never quite know what to DO with it.
However, I bit the bullet, dug out some gorgeous foiled vellum and had a wee play which resulted in this vellum tree easel card.
The gold dotty vellum was embossed with the Papermania Swirly Tree and then cut out before being matted onto gold mirri card, which was also cut around leaving a border.  I then added a few amber coloured stars for decoration and set it aside to dry while I made an 8" x 8" easel card blank.   
I had some lovely pearlescent card already picked out which proved perfect for embossing with the Cuttlebug Trees and Snowflakes that I wanted for the decorative strips and it has just a hint of sparkle to catch the light.  Luvverly!
Some luxury gold wire ribbon provides a bow for the top panel and the off cuts of vellum and gold mirri were cut with Nestabilities Stars to fill the space that was not embossed with the trees.   
The final panel was made up using the text vellum matted onto gold mirri and held on with small brads.  I also added some glue where I knew it would be hidden by the tree just to be doubly secure.
So despite my initial reservations, I'm actually quite happy with the final result and would not be embarrassed to send it to someone special this Christmas.
My fellow teamies and our Guest Designer Jenny have also been busy 'pootling' with their vellum, so hop over and see what they've been up to at Bah! Humbug! 
Meanwhile ... I am off to enter my card at  We Are In 2 Crafting ... Are You? because it fits their Christmas themed October Challenge with a recipe of

3 snowflakes (at least) - embossed snowflakes ...  
2 papers - 2 different vellum ...  
1 ribbon - gold wire ribbon

Wednesday, 13 October 2010

Happy Birthday Dad

It's my dad's birthday today and I decided to make a stepper card for him ... just to be a little bit different from all the other cards dropping through his door.
The majority of the papers were in my K. & Co. drawer and all were matted onto gold mirri card before being added to the seperate panels.   
The lovely foiled paper is from a pack called "Vennaissance" by Laurence Llewelyn-Bowen and I cut one of the foiled oval figures to mat it up with offcuts from the other papers to create a focal panel, before adding the greeting.  The lovely wide green and gold ribbon was perfect for a nice big bow to decorate the back panel.  
The scalloped border across the front is also K. & Co. from a 12" x 12" pad of double-sided papers and some dark green adhesive pearls add just enough decoration without being OTT.  There are a couple of challenges this week which suit this card so I may as well join in.  Well ... you never know when lady luck is going to knock at the door ... rata..tat..tat.
Crafty Cardmakers Spotlight Challenge - Fancy Folds 
Crazy 4 Challenges 58 - Birthday
Anything Goes Challenge 20 - Ribbons

Friday, 8 October 2010

Bah! Humbug! 39

I missed last week's Bah! Humbug! Challenge as I wasn't feeling too great ... okay I was feeling sorry for myself and a wee bit bleurgh ... but my fellow 'Humbuggers' were very understanding and let me have the week off - thanks ladies mwah xx.
Didn't want to push my luck with them though, so made a little bit of an effort this week for the 'Cutie' Challenge.  (Emphasis on the 'LITTLE')
I have a gazillion different cuties in my stash so was a little spoiled for choice to be honest.  However I opted for these cute Forever Friends characters for 2 reasons.
* They were close at hand - didn't have to go delving 
AND 
* They are stickers - no effort required at all
PEEL AND PLACE ... job done!
The red foiled card is from Kanban and already beautifully embossed, so nothing to do there.  It was a left over strip from a previous project but was a smidgen too narrow, so to make it fit a DL card blank, I matted it onto gold mirri.  Clever huh?  The stickers were then popped onto scraps of gold mirri and cut around to give them a wee border before popping them, across the front with silicon glue, varying the height slightly 
Then I grabbed some Star Dust Stickles and 'sparkled up' the letters, added the sentiment and ... FINALLY came the hard part - waiting for it all to dry!  
I have also 'sparkled up' their furry hat trims since taking these photos so they're even cuter.
Ann, Irene and our Guest Designer Jenny have put far more effort into their gorgeous Cute Creations, so you must visit and drool.  We also named the winner to last week's prize draw so pop over to see if it was you ... but if it wasn't,  don't despair.  We still have one more Monthly Prize to award in November and there may be a couple of random spot prizes making their way to surprise winners before 2010 closes.  There'll also be the winner of our Loyalty Prize Draw to announce in December for those who have managed to complete 30 of our 2010 challenges.  So all still very exciting!

Now I wonder if Mr. Blogger has reduced my followers list to a decent size yet so I can go visiting.   The thumbnails were absolutely humungous this morning (maybe been taking growth hormone?) so I could only see about 4 posts before the page ran out.  NOT good.

Tuesday, 5 October 2010

A Fairy Happy Birthday

It's been a while since I showcased any of my recent cards ... partly because I haven't felt up to it following a rather nasty flareup of HS and the inevitable 'dice'n'slice' (yowch!) ... and partly because Mr. Blogger has been a wee bit temperamental and I haven't had the energy or inclination to do battle.  However, I'm feeling better today and have even managed to drive myself to the surgery this morning so things are on the up'n'up.
This card was completed more than a week ago for submission to the Sugar Bowl Challenge 44 - a sketch by Lilian with the optional theme of 'A Birthday Card'.   As you see,  I have done a step card but hopefully you can still recognise the sketch layout.
The image is Sugar Nellie -Woodland Fairy which has been coloured with Promarkers and sparkled up with Diamond Stickles.   The patterned papers are all from DCWV Spring Glitter Stack although to be honest,  they are more like cardstock than paper,  and as a bonus, they're beautifully glittered too.  You may need to click the photos to get a better idea of how sparkly they really are.
I have used some coordinating textured card to mat it onto and a strip was also cut with zig-zag scissors before decorating with pretty non fray ribbon and a prima flower.  The image was cut with Labels Four Nestablilities and then mounted with silicon glue across the ribbon.   The final finishing touch was the addition of some pretty graduated 3D butterflies, one for each level. 
Flutter By Wednesday Challenge 124 are looking for some 'Sparkle and Shine' and as the papers, butterflies and fairy all sparkle with glittery gorgeousness,  I reckon I'm safe there.  Coincidently A Spoonful of Sugar have that as their theme this week too ... and Hazel let me know that  Moving Along With The Times are looking for Fairies or Fantasy ... so it's sparkles all round!
I'll be back later with some more cards which have been patiently waiting for their 5 seconds in the spotlight but I really must go and see what the postie delivered this morning.  Enjoy the rest of your day, wherever you are and whatever you are doing.

Saturday, 25 September 2010

**Anniversary Hugs**

I remember reading this quote a long time ago ... 
"You don't marry the person you can live with, 
You marry the person who you cannot live without."
 ... and decided it was good enough advice to follow.
So I did
 Today is our 23rd Anniversary

Friday, 24 September 2010

Bah! Humbug! 37 - Stars

My DT example for Bah! Humbug! this week follows a wonderful Acetate Card Tutorial, which demonstrates a simple technique to ensure your background doesn't tip forward when the finished card is on display.   Not good if you've been sneaking the sherry LOL!  It was written by my very good Humbugger buddy and VERY bad influence Ann, who constantly leads me into temptation where crafting goodies are concerned and is responsible for my ever growing obsession with rubber - of the stamping kind in case you're wondering.  
I used the free downloads from the new 'Beatrix Potter - A Winter's Tale' release which is currently available for members at Crafter's Companion.   Very generous and perfect for those of us who have to be a bit more canny with their 'cally-dosh' at the moment.    I'm entering their Monthly Challenge where the prize up for grabs is the whole Winter's Tale Collection - SQUEAL! - so wish me luck.   I will try to remember to breathe until the winner's name has been announced and not be too disappointed if the random winner isn't me!
As I have mentioned before, decoupage is definitely not my favourite technique but, as the ideal choice for this kind of card, I had no choice but to get out the snips and have to confess now I see the finished result,  it was worth making the effort.   As I'd only printed 2 sheets of background scenery, I improvised for an additional layer with a piece of blue glitter card which was torn and then attacked with Icicle Stickles.   AND because I love the 'Stickles Effect' so much, the trees and snow were punished severely too.   
See what I mean?
The bunnies are also decoupaged, although it is difficult to see the layers in this photo - and yes - they were also 'stickled' within an inch of their little bunny lives.  The extra sparkle hasn't slowed them down any though.
My original intention was to add the stars randomly across the acetate front, but I was reluctant to hide the scenery so opted for arranging them across the sentiment panel at the bottom.  Acetate cards can have a tendency to topple unless heavy duty acetate is used, so doing this helps as a card stabiliser.
The other DT members Ann, Irene and our Guest Designer Anne, have some beautiful starry samples to show you so head over and check them out too.