Monday, 23 July 2012
And The Winner Is ....
..... Queenie!
Whoo Hoo!
Actually ... between the blog and facebook only 2 people correctly guessed Design No.3 was the chosen card so it was good odds lol.
Great excuse to come and see you now ... if one were needed that is lol ... to deliver your prize goodies, consisting of ....
A selection of pretty 6"x6" papers, gorgeous satin ribbons and a pack of liquid metal markers.
Lush ... Lush ... LUSH!
I'm sure you'll find a use for them all Tracy given how amazing your projects always are.
Tuesday, 17 July 2012
Wedding Fever
I was recently asked to make a wedding card and was given free rein with both design and colours. GULP! Sometimes having this much freedom can be more difficult than when customers are specific about what they want, but I decided to try a few ideas and let her choose a favourite.
Which one would you choose?
If your selection matches the actual card chosen then your name will go into a draw for a wee crafty prize.
Deadline midnight GMT Sunday 22nd July.
Click the photos for close-up views.
Design 1
A linen effect white card base decorated with blue and white diecut hearts layered onto diecut blue and silver mirri card, embellished with a simple bow and greeting.
Inside shows diecut panels and a simple stamped message.
Design 2
I created an off centre gatefold from A4 white linen card, adding a panel of textured burgundy card and a matching Kanban wedding topper. A simple bow and stamped greeting are the only decoration.
I'd like to submit this card as my first entry to
Sparkles Monthly Challenges - 34 Weddings
Design 3
I opened an image from my flowers folder in PSP (PaintShop Pro), and typed a greeting before printing onto white linen cardstock, which gives a look almost like canvas. Both elements were then matted onto silver mirri.
White organza ribbon was wrapped around the fold on a landscape base card and tied in a bow with pearl gems added for decoration.
The inside message was stamped onto white linen card before being matted onto silver textured card and placed inside.
I'm hoping this card is eligible for entry into
Southern Girls Challenge 48 - Pearls
Sparkles Monthly Challenges - 34 Weddings (2nd entry)
Design 4
I created an easel card base from cream cardstock and opened another beautiful rose image in PSP, adding a greeting onto the image before printing this time.
The easel card panels were then decorated with pretty paper from Papermania Confetti pack, matted onto black and gold mirri and the main image was then adhered to the front panel with foam pads.
Wide cream organza ribbon was wrapped around the back and tied in a knot and a matching bow was added to the image panel.
The stopper was created using more layered panels of paper and card adhered to the base with foam pads before being decorated with paper flowers, pink ribbon bows and pretty iridescent fabric butterflies.
A greeting was stamped and embossed with gold powder, then diecut and matted onto black and gold card.
A matching box completes the ensemble as this card is way too bulky for an envelope.
I'm entering this card into
The Cupboard Trilogy - Colour Palette Challenge
The Cupcake Craftroom - July: Layers
Sparkles Monthly Challenges - 34 Weddings (3rd entry)
PLEASE REMEMBER...
Don't forget to leave a comment with your favourite from the selection and you may be lucky enough to win a prize.
Which one would you choose?
If your selection matches the actual card chosen then your name will go into a draw for a wee crafty prize.
Deadline midnight GMT Sunday 22nd July.
Click the photos for close-up views.
Design 1
A linen effect white card base decorated with blue and white diecut hearts layered onto diecut blue and silver mirri card, embellished with a simple bow and greeting.
Inside shows diecut panels and a simple stamped message.
Design 2
I created an off centre gatefold from A4 white linen card, adding a panel of textured burgundy card and a matching Kanban wedding topper. A simple bow and stamped greeting are the only decoration.
The slim panel shows white padded hearts and satin ribbon matted onto layers of white and burgundy card.
Inside, a panel of white linen card has been corner punched and decorated with diamante gems before being matted onto burgundy card and stamped with a greeting.I'd like to submit this card as my first entry to
Sparkles Monthly Challenges - 34 Weddings
Design 3
I opened an image from my flowers folder in PSP (PaintShop Pro), and typed a greeting before printing onto white linen cardstock, which gives a look almost like canvas. Both elements were then matted onto silver mirri.
The inside message was stamped onto white linen card before being matted onto silver textured card and placed inside.
I'm hoping this card is eligible for entry into
Southern Girls Challenge 48 - Pearls
Sparkles Monthly Challenges - 34 Weddings (2nd entry)
Design 4
I created an easel card base from cream cardstock and opened another beautiful rose image in PSP, adding a greeting onto the image before printing this time.
The easel card panels were then decorated with pretty paper from Papermania Confetti pack, matted onto black and gold mirri and the main image was then adhered to the front panel with foam pads.
Wide cream organza ribbon was wrapped around the back and tied in a knot and a matching bow was added to the image panel.
The stopper was created using more layered panels of paper and card adhered to the base with foam pads before being decorated with paper flowers, pink ribbon bows and pretty iridescent fabric butterflies.
A greeting was stamped and embossed with gold powder, then diecut and matted onto black and gold card.
A matching box completes the ensemble as this card is way too bulky for an envelope.
I'm entering this card into
The Cupboard Trilogy - Colour Palette Challenge
The Cupcake Craftroom - July: Layers
Sparkles Monthly Challenges - 34 Weddings (3rd entry)
PLEASE REMEMBER...
Don't forget to leave a comment with your favourite from the selection and you may be lucky enough to win a prize.
Labels:
Easel Card,
Embossing Powders,
Gate Fold,
Mirri Card,
Papermania,
PSP,
Ribbon,
Stamps,
Wedding
Saturday, 30 June 2012
School's Out! ...
...For Summer!
Thursday was the final day of term and the children are now free to enjoy a break from their normal routines ... some warm sunshine over the next 6 weeks would be very welcome too!
I put together some simple treat gifts for my daughter's teachers, using Papermania Honey and Hugs papers and some coloured card.
Plain white card was cut into rectangles and the patterned papers were matted onto coloured card leaving a narrow border.
The treat pouch was created by scoring and folding 6" wide card at 2" and 4" and using a scalloped circle punch for the cutaway in the centre section, before securing at the back with strong double-sided tape. This was then stapled at the top and bottom onto the prepared paper panel and then stuck to the white rectangle base, hiding the staples from view.
A computer generated message was mounted onto coloured card cut with nestabilities and adhered with silicon glue to hide the securing staple at the front.
On the reverse I had attached a panel with room for a personal message and by adding ribbon to make a hanging, the teachers now have a cute keepsake for their notice boards when the chocolate is gone.
Coincidently 4 Crafty Chicks are doing a "School's Out Challenge" this week and the current Joanna Sheen Challenge is "Summer Days" so I'm submitting my wee treat hangings for consideration.
My precious mum celebrates her birthday today so we'll be popping round with her card and gift this afternoon. I'll share her card ... and the one made for my dear friend Ann who also has her birthday today ... later, so's not to spoil the surprise.
Have a wonderful weekend, wherever you are and whatever you are doing ... and thank you for visiting.
Thursday was the final day of term and the children are now free to enjoy a break from their normal routines ... some warm sunshine over the next 6 weeks would be very welcome too!
I put together some simple treat gifts for my daughter's teachers, using Papermania Honey and Hugs papers and some coloured card.
Plain white card was cut into rectangles and the patterned papers were matted onto coloured card leaving a narrow border.
The treat pouch was created by scoring and folding 6" wide card at 2" and 4" and using a scalloped circle punch for the cutaway in the centre section, before securing at the back with strong double-sided tape. This was then stapled at the top and bottom onto the prepared paper panel and then stuck to the white rectangle base, hiding the staples from view.
A computer generated message was mounted onto coloured card cut with nestabilities and adhered with silicon glue to hide the securing staple at the front.
On the reverse I had attached a panel with room for a personal message and by adding ribbon to make a hanging, the teachers now have a cute keepsake for their notice boards when the chocolate is gone.
Coincidently 4 Crafty Chicks are doing a "School's Out Challenge" this week and the current Joanna Sheen Challenge is "Summer Days" so I'm submitting my wee treat hangings for consideration.
My precious mum celebrates her birthday today so we'll be popping round with her card and gift this afternoon. I'll share her card ... and the one made for my dear friend Ann who also has her birthday today ... later, so's not to spoil the surprise.
Have a wonderful weekend, wherever you are and whatever you are doing ... and thank you for visiting.
Monday, 18 June 2012
A Manly Time
The weekend's cardmaking was predominantly male orientated as we celebrated Father's Day here in UK.
A Dad is a girl's "first love" and will always hold a special place in her heart ... I'm lucky enough that mine lives close by and is still playing an active and important role in our family life.
Another important man in my life is, of course, my husband and the children each needed a card for him, so I was kept busy in the craft room on Saturday.
My daughter's card uses elements from a collection of Fizzy Moon goodies 'cos she likes 'cute'.
The front of a large square card was folded back to create a z-fold card and the panels were decorated with layers of plain blue card and glittery heart patterned paper matted onto silver mirri. A strip of blue ribbon knotted on one side helps to break up the empty space.
Fizzy Moon chipboard emellishments were matted onto silver mirri card and placed on the front panel with foam pads ... simple silver peel off letters spelling the word 'DAD'.
The sweet sentiment was computer generated on my PC and placed inside, leaving enough space for her to write her own personal message.
Something a little more grown up was needed for my son's card, so I decorated a large square card inside and out with GCD studio double-sided papers and folded an origami shirt from a matching leftover scrap. Black Stickles glitter glue was perfect for creating shiny buttons and alphabet letters on gold mirri punched circles are arranged above it. No ribbons this time lol!
The sentiment inside came from a little used Penny Black stamp set which I came across the other day and I thought it was ideal as a meaningful, yet non-gushy, message that a grown up son could send to his dad.
For my own dad's card, I coloured a digi image of a dog relaxing in his chair, armed with nibblies, a cuppa' and ... most importantly ... the TV remote! Quite appropriate really given that Euro 2012 is dominating TV at the moment ... yawn.
This image was bought ages ago to help raise awareness and funds for an Air Ambulance charity and it is an almost identical replica of a card featured previously on my blog somewhere ... but unfortunately I can't find it and I can't remember who to credit. If anyone knows or can point me in the right direction, I'd be very grateful. Rest assured when I do find out I will add the relevant credits and links etc.
Finally I just wanted to show the belated birthday card made for one of Naomi's ten pin bowling pals. It was his birthday last week but as Naomi was in The Ochils hiking and camping for Duke of Edinburgh Bronze Award at the time, she was a bit late.
Kanban came to the rescue with this cute Scottie dog image with tartan background elements and I played around with words for the computer generated belated message inside.
I am submitting entries to the following Male themed challenges ...
My Sheri Crafts - Challenge #87 Father's Day
Dream Valley Challenges #34 - For That Special Guy
CI Paints - Inspired By Father's Day
Card Makin Mamas - Challenge #47 Father's Day
A Dad is a girl's "first love" and will always hold a special place in her heart ... I'm lucky enough that mine lives close by and is still playing an active and important role in our family life.
Another important man in my life is, of course, my husband and the children each needed a card for him, so I was kept busy in the craft room on Saturday.
My daughter's card uses elements from a collection of Fizzy Moon goodies 'cos she likes 'cute'.
The front of a large square card was folded back to create a z-fold card and the panels were decorated with layers of plain blue card and glittery heart patterned paper matted onto silver mirri. A strip of blue ribbon knotted on one side helps to break up the empty space.
Fizzy Moon chipboard emellishments were matted onto silver mirri card and placed on the front panel with foam pads ... simple silver peel off letters spelling the word 'DAD'.
The sweet sentiment was computer generated on my PC and placed inside, leaving enough space for her to write her own personal message.
Something a little more grown up was needed for my son's card, so I decorated a large square card inside and out with GCD studio double-sided papers and folded an origami shirt from a matching leftover scrap. Black Stickles glitter glue was perfect for creating shiny buttons and alphabet letters on gold mirri punched circles are arranged above it. No ribbons this time lol!
The sentiment inside came from a little used Penny Black stamp set which I came across the other day and I thought it was ideal as a meaningful, yet non-gushy, message that a grown up son could send to his dad.
For my own dad's card, I coloured a digi image of a dog relaxing in his chair, armed with nibblies, a cuppa' and ... most importantly ... the TV remote! Quite appropriate really given that Euro 2012 is dominating TV at the moment ... yawn.
This image was bought ages ago to help raise awareness and funds for an Air Ambulance charity and it is an almost identical replica of a card featured previously on my blog somewhere ... but unfortunately I can't find it and I can't remember who to credit. If anyone knows or can point me in the right direction, I'd be very grateful. Rest assured when I do find out I will add the relevant credits and links etc.
Finally I just wanted to show the belated birthday card made for one of Naomi's ten pin bowling pals. It was his birthday last week but as Naomi was in The Ochils hiking and camping for Duke of Edinburgh Bronze Award at the time, she was a bit late.
Kanban came to the rescue with this cute Scottie dog image with tartan background elements and I played around with words for the computer generated belated message inside.
I am submitting entries to the following Male themed challenges ...
My Sheri Crafts - Challenge #87 Father's Day
Dream Valley Challenges #34 - For That Special Guy
CI Paints - Inspired By Father's Day
Card Makin Mamas - Challenge #47 Father's Day
Labels:
Chipboard,
Dad,
Father's Day,
Fizzy Moon,
Kanban,
Peel Offs,
Penny Black,
Ribbon,
Scallops,
Stamp,
Stickles,
z-fold
Friday, 15 June 2012
Flaming June? ...
Errrrmmm ... I don't think so!
Any hint of flames would be quickly extinguished in the abysmal weather we've had recently.
However on a more positive note ...
It was my son's birthday yesterday and obviously cards were needed so what better excuse could there be to give my crafty stash a long overdue airing?
As he is, (and always has been), a dedicated Nintendo fan, the only difficulty was in deciding which character to use. After much deliberation, I plumped for Mario and Yoshi simply because they're in my own personal list of favourites. Any hint of flames would be quickly extinguished in the abysmal weather we've had recently.
However on a more positive note ...
It was my son's birthday yesterday and obviously cards were needed so what better excuse could there be to give my crafty stash a long overdue airing?
An A5 card blank was covered with star paper and Yoshi was printed a couple of times so I could decoupage him for a 3D effect, (although it isn't showing very clearly in the photos). Once dry this was matted onto gold mirri and placed on the front panel with foam pads. The sentiment was something that simply popped into my head while I was pootling, so I quickly printed it, used coloured chalk to kind've match the background paper and cut it out with an oval nestie before matting onto a gold mirri scalloped oval.
One down ... one to go!
Sticking 2 DL size cards together gave me a tri-panel card, the front of which was decorated with fabulous blue glittery paper - a perfect background for Mario to fly through. I cut some silver stars with the cuttlebug and placed an embossed panel across the bottom instead of a stamped greeting.
Red card was scored and embossed top and bottom and stars were cut with nesties for a bit of decoration on the middle section.
Another silly sentiment was matted onto a slightly larger piece of blue glittery paper and the inside was done in a jiffy!
Cards completed and I'm pleased to say he was delighted with them.
Labels:
Birthday,
Decoupage,
Embossed Card,
Mirri Card,
Nestabilities,
Pootling
Saturday, 7 April 2012
Bunnies and Blog Hop
You can't have Easter without having bunnies and these little cuties from LOTV obviously love cupcakes ... well ... thinking about it ... who doesn't?
They were coloured with Promarkers and cut out with Nestabilities Labels Four before being added as a topper to a 5" x 5" easel card, already decorated with gorgeous Easter papers from Paper Cellar. A strip of multicoloured ribbon, a couple of pink pearls and some paper flowers with Stickle centres add some dimension and sparkle.
The 'stop' is provided by using a slim strip of paper, matted onto silver mirri and adhered to the base with foam pads to raise it. The greeting is a simple silver peel off on a punched circle of paper which is attached to a silver daisy flower with silicon glue.
The card does fold flat enough to fit into an envelope although it would require a 'large' stamp for posting because of the 3D elements.
There are a gazillion Easter themed challenges on the go right now but I have chosen just a couple to play along with ...
C4E - #66 Bunnies and Chicks PLUS Blog Hop
Card Makin Mamas - #42 Easter
Crafty Sentiments - Bunnies
Incy Wincy Designs - #140 Easter
Now I'm hippitty- hopping back over to join in the Crafts 4 Eternity blog hop. Have a super Saturday ... wherever you are and whatever you are doing.
Crafty Sentiments - Bunnies
Incy Wincy Designs - #140 Easter
Now I'm hippitty- hopping back over to join in the Crafts 4 Eternity blog hop. Have a super Saturday ... wherever you are and whatever you are doing.
Labels:
Challenge,
Cupcakes,
Easel Card,
Easter,
LOTV,
Nestabilities,
Paper Cellar,
Promarkers,
Ribbon
Friday, 6 April 2012
Meet Dudley
WELL! This week has been a totally different story weatherwise, with hailstones, high winds, lashing rain and even snow! ... so no 'Al Fresco' crafting at all. Much safer to stay snuggled in the craft room surrounded by loads'a' luvverly stash to keep me warm.
This cute little chap is called Dudley and he and the oversized button are Pollycraft images, (actually they're both freebies from ages ago). This card was supposed to be my entry for their 'Chocklit Challenge - 133' ... but I missed the deadline. Whoops! However, I reckon he's still cute enough to be worth showing and fortunately for me, Papertake Weekly Challenge is 'Anything Goes' with the option of monotone, so my Dudley card in shades of brown should qualify as a valid entry.
He's been coloured with Promarkers before being cut out with deckle edged scissors and glittered up with green stickles, likewise the button. The papers are 6" x 6" Papermania - Simply Elegant, which I've had for a very long time and only recently rediscovered while looking for something else ... a very common occurrence amongst crafters. Strips were cut from 2 complementary sheets, matted onto dark brown card and attached to the front of the card blank and then Dino was added with foam pads to give him a little lift.
Inside, is simply decorated with a a strip of patterned paper, matted onto brown and finished with a stamped greeting.
I'd also like to enter my Dudley card into the following challenges ...
Just Keep On Creating - #1 Anything Goes
Papercraft Star - #91 Anything Goes
Make It Monday - #83 Anything Goes
I'd also like to enter my Dudley card into the following challenges ...
Just Keep On Creating - #1 Anything Goes
Papercraft Star - #91 Anything Goes
Make It Monday - #83 Anything Goes
Thursday, 29 March 2012
Spring Has Sprung!
We have been enjoying some beautiful sunny weather for the last week or so, which is not unusual for March EVEN here in Fife! It has been unseasonally warm, with temperatures up in the high teens and even tickling the twenties so it's been
March Madness INDEED!
Taking advantage of this, I decided to indulge in a couple of hours worth of 'Al Fresco' creativity, armed with my trusty Promarkers and a selection of stamped images.
Using one of the completed LOTV cuties, I created this pretty easel card for a lovely fellow crafting friend whose birthday is today ... HAPPY BIRTHDAY NATALIE xx

Once coloured, she was cut out using Nestabilities Labels One, (as were the other topper layers), and once assembled together, the whole thing was adhered with foam pads to the folded front panel which had been previously decorated with embossed mirri card.

On the base I used the negative section previously cut with the nestabilities and added some pretty patterned paper behind ... waste not want not! ... before using a white gel pen to add some 'faux stitching' around the edge. The greeting was stamped in black onto a smaller matching shape which was also outlined with 'faux stitching'. Two simple flat backed pearl beads are all that's needed to keep the folded front panel supported.
The flowers made this card a bit bulky for an envelope so I made a box instead and as it was hand delivered this morning, (along with a wee surprise gift), postage costs were not an issue.
Talking of postage ... with the impending huge price hike on stamps due next week, (1st class jumps from 46p to 60p!), I will be bulk buying as many as I can reasonably afford in an effort to postpone the pain. Like many others there will be a serious culling of the Christmas card list later this year too ... a sad but necessary evil.
I will be entering this card into
Week 4 - LOTV National Craft Month Competition.
Tomorrow marks the last day of the school term and hopefully we can look forward to continued lovely weather. Wishful thinking? Well ... possibly ... but on the other hand, maybe Spring really has sprung!
The flowers made this card a bit bulky for an envelope so I made a box instead and as it was hand delivered this morning, (along with a wee surprise gift), postage costs were not an issue.
Talking of postage ... with the impending huge price hike on stamps due next week, (1st class jumps from 46p to 60p!), I will be bulk buying as many as I can reasonably afford in an effort to postpone the pain. Like many others there will be a serious culling of the Christmas card list later this year too ... a sad but necessary evil.
I will be entering this card into
Week 4 - LOTV National Craft Month Competition.
Tomorrow marks the last day of the school term and hopefully we can look forward to continued lovely weather. Wishful thinking? Well ... possibly ... but on the other hand, maybe Spring really has sprung!
Labels:
Easel Card,
Embossing,
LOTV,
March Madness,
Mirri Card,
Nestabilities,
Promarkers,
Stickles
Sunday, 18 March 2012
**Happy Mother's Day**
There is no greater gift than the gift of Motherhood ... treasure it ladies and enjoy your special day, whatever it may bring.

These two cards were each created using the same ingredients consisting of pretty papers from the Flowery Papermania Collossal Paper pad, a strip of gorgeous shimmery ribbon and the inevitable diamante adhesive gems that have proved to be an absolute 'must have and must use' when it comes to butterflies.

These two cards were each created using the same ingredients consisting of pretty papers from the Flowery Papermania Collossal Paper pad, a strip of gorgeous shimmery ribbon and the inevitable diamante adhesive gems that have proved to be an absolute 'must have and must use' when it comes to butterflies.

This is my first post of 2012 so as a tentative step back into blogland I'll be entering these cards into the following challenges ...
Tuesday, 27 December 2011
***FESTIVE FUN FOR EVERYONE***
May Your Hearts and Homes Be Filled
With Love and Laughter For Christmas and Throughout 2012
Friday, 18 November 2011
Bah Humbug! Challenge 45
For our challenge at Bah! Humbug! this week, we're looking for you to share some gift wrapping ideas, and we'd like to see how creative you can be making your presents look extra specially pretty.
I decided to keep things cheap'n'cheerful by recycling a card sent to us last year to make a gift box. It's a really simple idea that works with virtually any card size but more importantly in these cash-strapped times ... it's "cheap as chips!"
Firstly remove the front portion of the card with the image you want to use and then cut a matching piece of plain card for the base, which you need to trim so it's slightly smaller all round ... just trim a smigeon so it will fit snugly together when assembled.
This is a great way of using up all those beautiful images on cards that you've received but can't bear to throw away ... OH YES! I know you have them too!
Recycling at it's best.
Our Guest Designer Colleen and Humbugger Ann have their own cool projects to show you so hop over to Humbug Hall for a quick peek before you get to work on your own ideas.
Score a line on all four sides of both card pieces, making sure your score line is the same distance from each edge, and then trim the corners to make tabs.
Glue the four corner tabs in place, allow to dry and VOILA ... you have a cheap yet pretty little gift box which has cost nothing! This is a great way of using up all those beautiful images on cards that you've received but can't bear to throw away ... OH YES! I know you have them too!
Recycling at it's best.
Our Guest Designer Colleen and Humbugger Ann have their own cool projects to show you so hop over to Humbug Hall for a quick peek before you get to work on your own ideas.
Wednesday, 12 October 2011
Condensing
I suppose I could, (or possibly even should), apologise yet again for my recent lack of blogging prowess ... for not visiting all the beautiful blogs on my favourites list ... for not being able to admire and drool over the eye candy on show ... for not leaving as many comments as I wanted to ... BUT to be honest, the simple fact is that I just haven't got the same time to devote to blogging as I used to and that's just how it is!
So rather than apologising for circumstances beyond my control ... for being too busy and my general lack of spare time, (which would be a waste of both my limited time and yours), I shall just condense my recent Bah! Humbug! DT examples into one single post, hope that someone will pop by to read what I've hurriedly written and leave it at that. Take a deep breath and run with me.
READY? LET'S GO!
Challenge 38 asked for a familiar favourite of crafters worldwide, in the form of Rudolph/Reindeer. I opted for a simple gatefold card decorated with a lovely paper from my stash, (which I think was a Dovecraft pack from a couple of years ago), and tied with a length of silver ribbon.
Challenge 39 involved incorporating Nativity into our projects and surprisingly, the DT came up with similar ideas, but the end results were all completely different. Take a look HERE and you'll see what I mean.
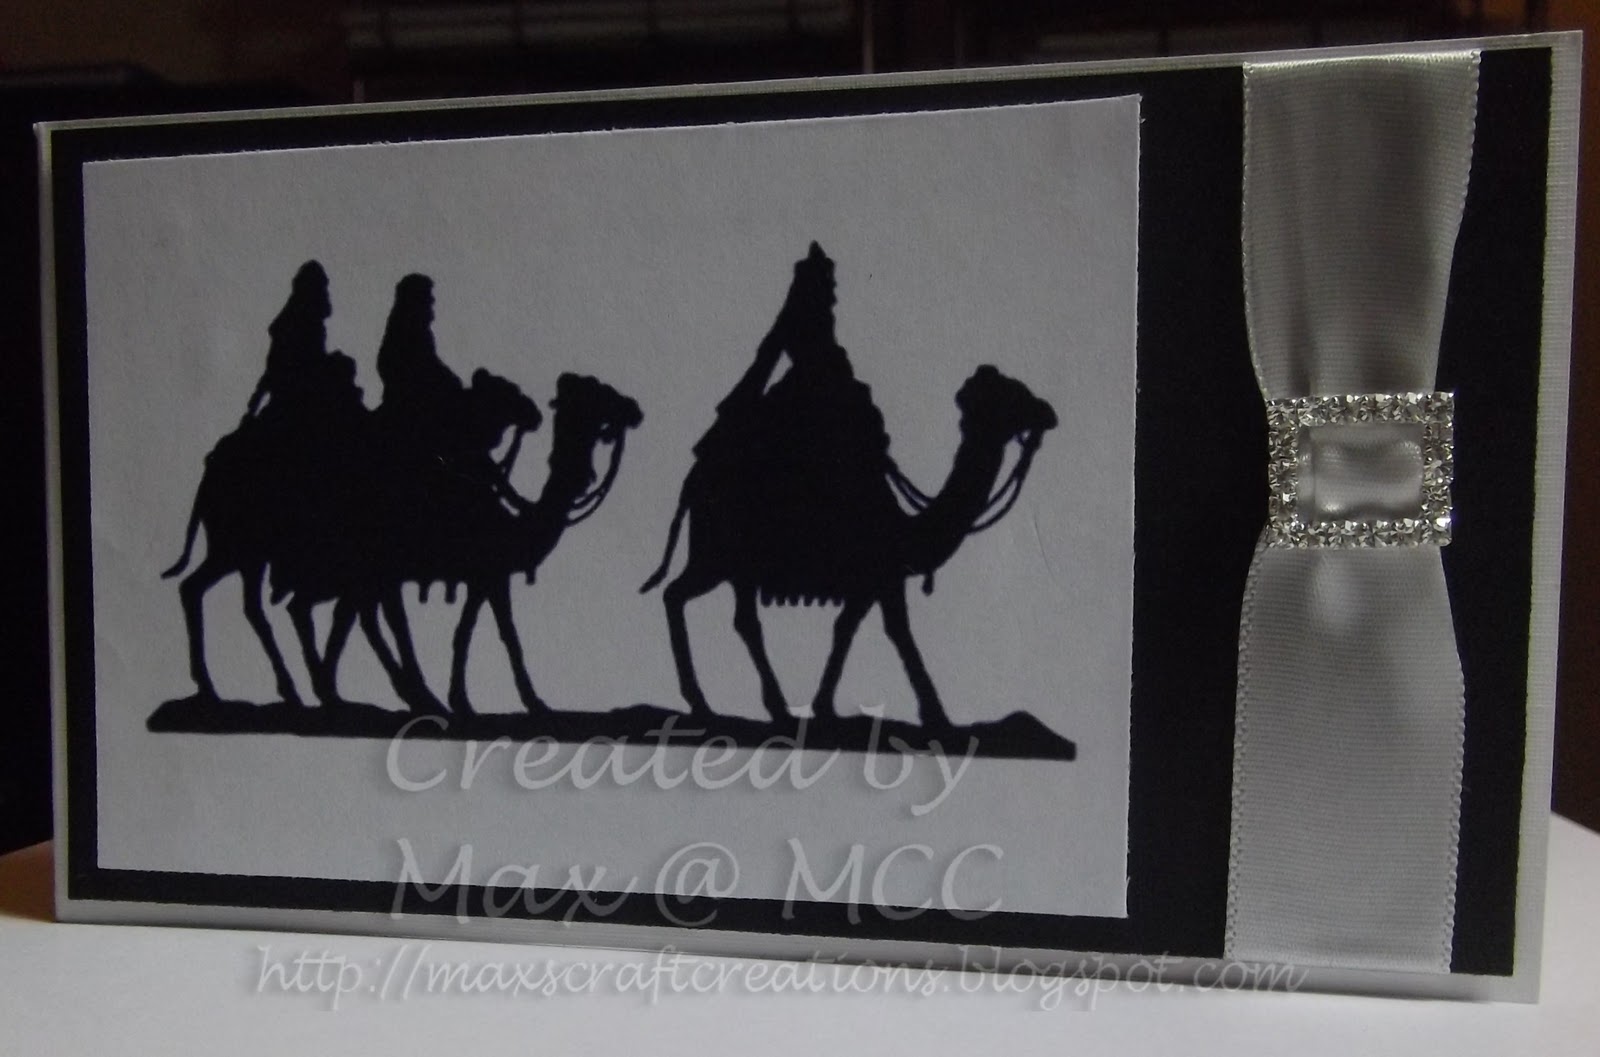
I stamped a silhouette image and mounted it onto a larger panel of black card, tied a wide satin ribbon and diamante clasp on the right and then adhered the whole thing to a white DL card blank.
Challenge 40 which is our current challenge, has been extremely popular, with oodles of entries sprinkling Christmas sparkle everywhere after we asked for Glitz and Glitter ... although I suspect the super prize on offer spurred many into joining in. Whatever the reason for the extra numbers this week, my DT example is beginning to look rather insipid by comparison to some of the fabulous creations I've seen so far.
But despite this, I stand by my decision to use pink teamed with black and silver on the basis that it has a fairly modern look, coupled with plenty of sparkle which is almost considered essential for Christmas by most of us crafty critters.
Hmmmmm ... looking back there's not a lot of condensing happening is there lol? ... but it's time for me to cut'n'run as there's the small matter of work to get up for tomorrow morning and sleeping in is NOT an option!
Nighty-night ... sleep tight ... and enjoy the rest of your week, wherever you are and whatever you are doing.
PS: Thanks for visiting ... and please don't worry or feel guilty if you haven't got time to leave a message ... I absolutely understand. xxx
So rather than apologising for circumstances beyond my control ... for being too busy and my general lack of spare time, (which would be a waste of both my limited time and yours), I shall just condense my recent Bah! Humbug! DT examples into one single post, hope that someone will pop by to read what I've hurriedly written and leave it at that. Take a deep breath and run with me.
READY? LET'S GO!
Challenge 38 asked for a familiar favourite of crafters worldwide, in the form of Rudolph/Reindeer. I opted for a simple gatefold card decorated with a lovely paper from my stash, (which I think was a Dovecraft pack from a couple of years ago), and tied with a length of silver ribbon.
Challenge 39 involved incorporating Nativity into our projects and surprisingly, the DT came up with similar ideas, but the end results were all completely different. Take a look HERE and you'll see what I mean.
I stamped a silhouette image and mounted it onto a larger panel of black card, tied a wide satin ribbon and diamante clasp on the right and then adhered the whole thing to a white DL card blank.
Challenge 40 which is our current challenge, has been extremely popular, with oodles of entries sprinkling Christmas sparkle everywhere after we asked for Glitz and Glitter ... although I suspect the super prize on offer spurred many into joining in. Whatever the reason for the extra numbers this week, my DT example is beginning to look rather insipid by comparison to some of the fabulous creations I've seen so far.
But despite this, I stand by my decision to use pink teamed with black and silver on the basis that it has a fairly modern look, coupled with plenty of sparkle which is almost considered essential for Christmas by most of us crafty critters.
Hmmmmm ... looking back there's not a lot of condensing happening is there lol? ... but it's time for me to cut'n'run as there's the small matter of work to get up for tomorrow morning and sleeping in is NOT an option!
Nighty-night ... sleep tight ... and enjoy the rest of your week, wherever you are and whatever you are doing.
PS: Thanks for visiting ... and please don't worry or feel guilty if you haven't got time to leave a message ... I absolutely understand. xxx
Sunday, 18 September 2011
Bah Humbug! Challenge 37
Don't know why I always seem to be chasing my tail these days, but here at last, is my DT offering for our Bah! Humbug! Challenge 37 - Flourishes and Swirls.
Last year I remember using this same design idea for my Mother-in-Law's personalised Xmas cards, making a batch of gold designs and a batch of silver and they proved to be quite popular, so I may be making some for myself to send this year.
![]() |
| Gold Collection 2010 |
![]() |
| Silver Collection 2010 |
Go on now - run along and see for yourself if you don't believe me and enjoy the remainder of your weekend ... wherever you are and whatever you are doing.
Subscribe to:
Posts (Atom)